1 Logitech April 7, 2024
Logitech Zoom Room NUC Recovery Image Information
Before you begin
●IMPORTANT: The computer must have gone through OOBE while connected to the internet and must show that the Windows is activated. If you try to re-image the system before it is licensed, the NUC will need to be replaced.

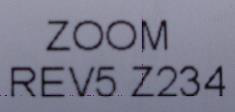
●Recovery media is ONLY for Windows 10 LTSC. ●Only use this recovery media on your Microsoft Teams Room Rev 1 (NUC8i5BEH, NUC8i7BEH) or Rev 2,3,4, (NUC11TNKi5) or REV 5 (NUC13L3Kv5) ●These instructions are intended to create boot media to recover the Microsoft Teams Room NUC. You will need: ●A USB stick formatted as FAT32 ●The USB stick should be large enough to contain the (unzipped) recovery media 18GB ●It is strongly recommended that you use the fastest USB media (USB 3.1) available to you, to minimize the time the re-imaging process takes. ●A USB Keyboard (to enter boot menu by pressing F10) Determine the recovery media There are three different hardware platforms, depending on which REV you have, you need to download the correct recovery image. Using the wrong recovery media will prevent the system from running optimally. REV 1 – On the bottom of the NUC there is no sticker clearly identifying the Rev version (this is also known as a Bean Canyon Nuc, NUC8i5BEH) REV 2 – On the bottom of the NUC there is a sticker indicating you have a REV2,3,4 device. Followed by Z211, Z213, Z221, Z224, Z232 (This is also known as a Tiger Canyon Nuc NUC11TKNi5) REV 5 – On the bottom of the NUC there is a sticker indicating you have a REV5 device . Followed by a Z234 (This is also known as an Arena Canyon Nuc NUC13L3Kv5) An Example:
Download the Media
REV1:
logi-z234-rev1-recovery.vhdx (19GB)
Hash: D0D1CCA698439598E86EE0780D91F9D2B836C1E9592149B4BE93ADE4595087A2
REV2-4:
logi-z234-rev2-4-recovery.vhdx (17GB)
Hash: AE4ABE785A622946BCC2FDEAF6B565216CBC19ECA27D67D458AE592EB7DCED4E
REV5:
logi-z234-rev5-recovery.vhdx (17GB)
Hash: A88351E82B2B2796F25C316B3584C8466E600A50EAD68F7CB89E560EC0840CED
To recover your NUC:
1.Plug the USB stick you wish to use into your desktop/laptop computer.
2.Right-click the USB stick, and select "Format..."
3.Use the "File system" drop-down to select "FAT32"
4.Mount the downloaded virtual disk from above by double clicking on it.
5.Copy the entire contents of the mounted drive to the USB drive
6.Eject your USB stick from your desktop/laptop computer
7.If your NUC is not already powered off, power it off now by pressing and holding the power button.
8.Connect the USB keyboard.
9.It is recommended to remove all room equipment except the keyboard from your NUC except the Front of Room display(s).
10.Plug your USB stick directly into a blue USB port. Do not use a black port.
11.At the POST boot prompt, press F10 to enter the boot menu
12.From the boot menu choose the USB drive
13.Get a cup of coffee, the imaging process can take some time.
14.Once the restoration process has completed, the system will reboot automatically.
15.Connect your room equipment.
16.After device installation is complete, Windows OOBE will start. The system will now be ready for installation/configuration for use in your environment.
17.IMPORTANT: If you made any BIOS changes, press F2 to enter BIOS and revert any changes made. While failure to revert changes will not affect imaging process, it may cause boot issues later.
18.Disconnect the keyboard
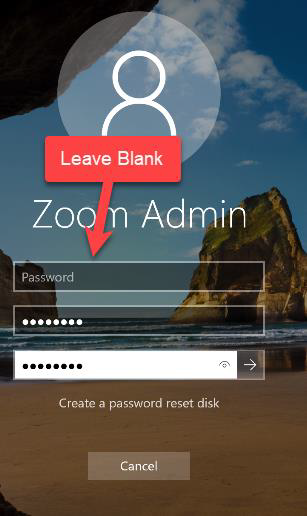
IMPORTANT: After you finish the recovery process, the password for ZoomAdmin will be reset. You will be required to change the password on the first logon. The current password is empty, do not enter a password in the existing password field. If you forget the password or do not create a password reset disk, and you forget the password, you will need to run through the recovery process again.
If the system fails to boot from the USB drive
REV 1 NUC
At the POST screen Press F2 to enter the BIOS. If this fails, you will need to plug in your keyboard to the USB-C Port with an adapter.
1.Click on the Advanced Tab

2.Click on Devices
3.Click on USB
4.On the right side select the port that has the USB drive connected, (do not enable all ports) and set the connection to enabled
5.Press F10 to save the settings and Reboot
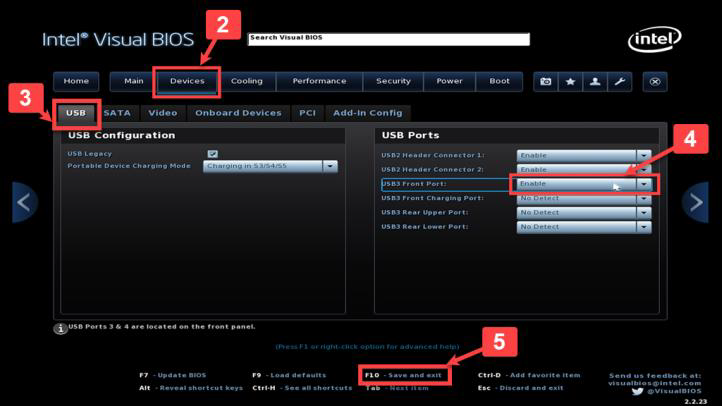
Rev 2 NUC
At the POST screen Press F2 to enter the BIOS. If this fails, you will need to plug in your keyboard to the USB-C Port with an adapter.
1.Click on Advanced
2.Click on USB

3.Select the port that has the USB drive connected, (do not enable all ports) and set the connection to enabled

4.Press F10 Save the settings
|